by David J. Watkins
Index <= Prev Page Next Page => Dew
Astrophotography Aquiring Images - The Mount
If you take images other than wide angle and star trails, you will want a good quality German Equatorial Mount or GEM. The mount will have a right ascension (RA) axis and a declination axis. The lens or telescope will sit on one end of the declination axis and a counter weight will be added to the other end of the declination axis. Servo motors control the motion of each axis so that the RA axis of the mount will rotate parallel with the rotation of the earth, allowing an object to be tracked across the sky. There are several manufacturers of decent astrophotography GEM mounts. While you can get mounts for a few hundred dollars, they may be ok for viewing but they will NOT cut it for astrophotography. Plan on spending at the very least $1000 on a GEM mount even for beginning astrophotography. The mounts are rated for their maximum weight capacity, make sure you do not exceed that capacity with the total weight of your equipment (telescope, camera, guide scope, adapters, etc.). Note that I keep mentioning the German Equatorial Mount, there are other style mounts but they will NOT work out for astrophotography. Most likely you will want to use an autoguiding system and a GEM is the only mount that will work with an autoguider system. Fork style Alt Azimuth mounts, while great for supporting a Schmidt Cassegrain scope, will not track properly for astrophotography. You may be able to get them to track an object across the sky, but they will suffer from field rotation. The object will rotate in the frame as it tracks across the sky. This will cause your stars to blur in your long exposure images.
Mount features:
You want to find a mount that has an option for a polar alignment scope, you should get the alignment scope with the mount. You will need this to polar align the mount. Perfect polar alignment is critical for astrophotography. Note that a polar finderscope is NOT the same as a finder scope! A polar finderscope is typically mounted inside the GEM mount, read your manual. When you get the mount you want to make sure that the polar finderscope has been collimated properly. That is when you rotate the RA axis on your mount, the center or intersection of the cross hairs in your polar findscope should be staionary and not move around. The actual cross hairs will rotate, but the intersection should remain stationary. If the center of the cross hairs moves at all when you rotate the RA axis on your mount, your polar finderscope will need to be collimated. There are many sources on the web that explain how to collimate a polar finderscope. If your polar finderscope is not collimated, your polar alignment will be off. This will cause issues when imaging.
A port for an autoguider is another key feature to look for in a mount. Even if you start out not autoguiding, like I did, you will probably end up autoguiding, like I did! I was glad I chose a mount with the port. Note on many mounts, you can guide the mount through the RS232 connection in the hand set, so make sure you can at least guide through the hand set or you will be purchasing a new mount when you decide to autoguide.
Don't forget you will need to be able to attach your lens or telescope to the mount so you will need to get the right kind of dovetail plate for the mounting. Telescopes are easier to find the right dovetail plate than camera lenses are. Camera lenses are not typically designed to mount on a GEM. If you are mounting a camera lens then you may have to modify a plate or design your own. There are two standard plate types. The larger Losmandy style is about 4 inches wide with varying lengths for different length telescopes. The thinner Vixen style mount is about 1.75 inches wide with varying lengths. I did not pay attention when I bought my Celestron scope, it came with the Losmandy style while my mount is a Vixen style. Fortunately they make plate adapters for mounting each type of plate to the other. The downside is the added weight.
Many GEM mounts will offer an optional GOTO system. It is worth it to get this feature. With a GOTO feature, (once you have a good polar alignment, and perform the 2 or 3 star alignment) you can key in just about any deep space object and the mount will automatically move to the location of that object. Otherwise you will have to manually position the mount to the location of your desired object, a frustrating task for a beginner. If you know the sky well and can easily find targets, it is not as big of an issue to manually position.
The following are manufacturers of mounts good for intermediate and beginning astrophotography. This is by no means a complete list.
When I started looking for a mount, I did not have a telescope, I was looking for something to support my Canon 600mm f/4L IS lens. It weighs less than 15 pounds with the camera. Orion recommended the Skyview Pro because I did not have a lot of weight with the lens. But I wanted to be able to mount an 8 inch telescope on it in the future. The Skyview Pro would be beyond its weight limit with an 8 inch scope on it. So I ended up choosing the Orion Sirius EQ-G GoTo mount for several reasons. Besides the weight limitiation of an 8 inch scope, I chose it over the Orion Skyview Pro because the Sirius uses the same gears as the more robust Orion Atlas mount. The Sirius will handle the weight of an 8 inch telescope with a camera and accessories. The reason I didn't choose the Atlas was because the Sirius weighed less so it was more portable. I live in a city and cannot shoot from my yard. I have to travel to a park outside the city to be able to shoot with less light pollution, so my gear needs to be portable.
A power supply for your mount:
You will need power for your mount. If you are away from a power source as in not in your back yard
where you can run a long extension cord, then you will need some kind of power supply.
Most mounts come with an automobile power adapter (cigarette lighter style adapter). You really
don't want to run your mount off of your car battery! If you have enough things connected, you can
drain your battery so your car won't start when you're finished! Also a car battery is not designed to
handle a small current draw for several hours, eventually you will degrade your car battery.
So you will want to find a good
rechargeable power supply for your mount. A deep cycle marine type battery is what is typically
recommended. They can output a lower current like a few amps for a long period of time and
can be recharged many times. A car battery outputs a high current for a very short time and then is
recharged while the car runs. Outputting a couple of amps for a long period of time will
significantly shorten the life of your car battery.
Orion sells two models of power supplies, a 12.5 Amp hour unit ($110) and a 17 Amp hour unit ($140). The advantage
of the Orion supplies are that they have connectors that the mount power cable will plug directly in to.
The downside to the Orion supplies are that there are many negative reviews on them. Many of them arrive
not working or stop working after the first or second recharge. The units are heavy and if defective they
must be shipped back at the customers cost. I decided to make my own supply.
My home made power supply:

I bought a small deep cycle battery rated at 12.5 Amp hours. The brand is Werker model WKA12-12F2.
I bought it at a local Batteries Plus store along with the charger. I think the battery was
around $40 and the charger was $20. The battery is about 1/6 the size of a small car battery and
weighs about 5 pounds.
Note that I use this battery only to power the mount. I power all of my accessories from another
battery. I did not want any accessories to drain the battery and cause the mount performance to
degrade if I am imaging. So I also bought a Werker model WKA12-18F2 18 amp hour battery and
another charger just for all of my accessories (dew heaters, autoguiding camera, etc.).
With the 2nd charger, I can charge both batteries at the same time and not have to wait two days
to use them. I started out with just the 12.5ah battery as I did not have any accessories when I
was just using a lens for astrophotography. The need for all the accessories came after I purchased
my telescope.
The photo shows the 12.5ah battery along with the connector cable assembly that I made up for it. The
mount power supply cable with the cigarette lighter style end, plugs directly into my connector cable assembly
as seen in the photo.
I chose 12.5 Amp hours for the battery because my mount draws a maximum of 2 amps while slewing,
but only about 0.5 amps while tracking. 95% of the time the mount is tracking so it uses
very little current. So in theory it should supply enough for 20 hours between slewing and
tracking. I have been running
it about two nights in a row before recharging it. That would be about 12 hours of runtime between
charges. Recharging is slow, it takes about 20 hours or so to get a full charge on the battery if I use it
two nights before recharging.
If you choose to go with your own power supply, you will need a way to connect the mount to your battery.
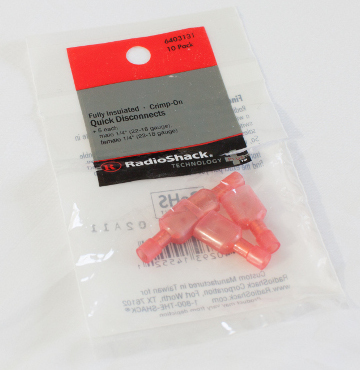
I made up my own connector cable. The key was picking up a few extra parts at the local
Radio Shack store. The first item was a 10 pack bag of 1/4 inch male and female crimp on
quick disconnects. (See photo on the right) The
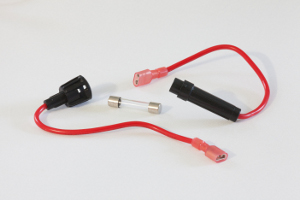
next item was an inline fuse holder. (See photo below) I chose a standard
1-1/4 inch glass fuse holder.
The last item was a package of glass 1-1/4 inch 5 amp fuses. The fuse is protection for
a dead short on the battery, you want it to blow before the battery is damaged. Since my max current
draw is 2 amps, a 5 amp fuse will not blow under the max load, but will blow quickly in the event of a short.
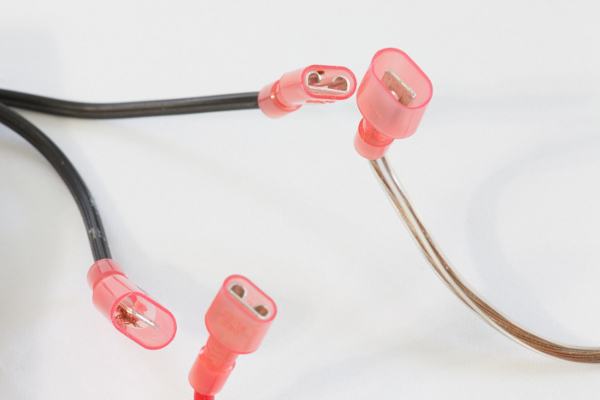
You will also need a short lenght of lamp cord or similar wire. It should be the same length as
the inline fuse holder with the wire ends attached. The wire can be any color except red!
The inline fuse holder came with red wires on both ends. Notice how I crimped a female quick disconnect on
each end of the fuse holder. We want to fuse the positive side of the supply. This configuration
will make it easier to identify the positive side of the supply when we connect to the battery. And the
positive terminal on the battery will be red so it is easy to remember to connect the red wire to the red
terminal.
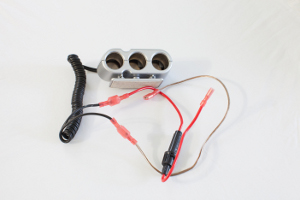
I used a cigarette lighter style power adapter that supplies power to 3 sockets for my adapter. I cut
the end off that plugs into the cigarette lighter and stripped back the insulation on the 2 wires in the
cable in preparation for crimping on Quick Disconnect connectors.
You can use a single socket, a dual socket, or a triple socket like the one I used. You can find these
adapters at any auto parts store. The important part is that once you cut off the plug, you need to identify
the positive and negative wires. The tip of the cigarette lighter style plug is the positive side and the
metal surface on the sides is the negative connection. You can use a digital multimeter or ohm meter
to determine which wire is connected to the point on the socket where the tip of the plug will be in contact.
Once I identified the positive and negative wires, I put a male quick disconnect on the positive wire.
Remember I crimped female quick disconnects on both ends of my inline fuse holder. The wires on the
inline fuse holder are red, this matches the red color on the positive terminal of the battery.
So only the positive wire from the adapter can be connected to the inline fuse holder.
Then I crimped a female quick disconnect on the negative wire of the adapter.
To finish the adapter, use a length of lamp cord or similar single wire, it should be the same length as the
inline fuse holder including its wire ends. But don't use a red wire! A red wire for the
negative wire will be confusing and you may end up connecting it to the positive battery terminal
putting the wrong polarity to your mount and that could damage your mount!
Crimp a male connector on one end of the single
length of wire and a female connector on the other end. So your inline fuse holder will have a female
connector on each end but your single wire will have one male end and one female end.
Then you can plug your inline fuse on to the positive adapter wire, it will only plug on to the
male quick disconnect which is the positive wire. Then plug your single length of
wire (male quick disconnect) on to the negative adapter wire (female quick disconnect).
Your adapter should look like the photo above, with two female quick connects to plug on to the battery.
The red wire will plug on to the positive lead of the battery and non-fused wire will plug on to the negative
lead of the battery.
Mount setup:
The key to getting the best tracking out of your mount is achieving perfect polar alignment. If you are using your mount for viewing only and not for photography, then you can be sloppy in your alignment. But if you expect to take exposures longer than 10 seconds with a super telephoto lens or a telescope, then your alignment must be precise. I'm not going to tell you that alignment is easy, but it is also not that difficult. It just takes time, expect to spend an hour or even more the first time! You should become familiar with your mount by reading the manual that comes with it and learning how to set it up. Below I give an overview of how I set up my Orion Sirius EQ-G Goto Mount. Your mount may require a slightly different sequence for setup, so read your manual.
Your mount will probably have a latitude adjustment on it. You will want to set that for the latitude of the location where you intend to use the mount. On my mount this is sort of a coarse adjustment and I usually have to re-adjust it ever so slightly when aligning polaris in the alignment scope. You can set the coarse adjustment before you get to your location, then fine tune it during polar alignment. These screws are also know as ALT adjustment screws.
Your mount should come with a sturdy tripod. The legs on the tripod for the mount will be 1.75 to 2 inches in diameter, much thicker than standard camera tripod legs. The tripod will also not extend to a height as high as your camera tripod either. This is to reduce vibrations. You don't want to extend a 30 pound payload plus the 30 pounds of the mount, or 60 pounds, more than a few feet off the ground.
The first thing you will want to do at your viewing or imaging location is set up the tripod legs. My tripod has a stub or post on it where you want to aim that stub in the direction of the celestial North Pole. This is also in the direction of true north on the earth. You can use a compass to help. But remeber, magnetic north is NOT true north. So you will have an offset from true north on your compass. And to make things confusing it will be different at each location. And to make things even more confusing it changes slightly every year! So how do you find the offset? NOAA (National Oceanic & Atmospheric Assoc) has a calculator on their web site. Aiming your tripod legs toward true north doesn't have to be perfect but it should be very close. You will adjust the azimuth screws later in your polar alignment to get the perfect alignment. Note if you are setting up near the equator where Polaris is below the horizon or if you are in the Southern Hemisphere, then you will want to find another source on polar alignment, instead of what I have! But if you live well north of the equator then you should be able to follow my alignment tips.
Next you will want to level the tripod. I use a small level about 6 to 8 inches long and adjust the leg height until the top of the tripod plate is perfectly level all the way around. I start with all the legs non-extended and only lengthen the leg height if needed during the leveling. That keeps the mass of everything as low as possible. I check the level on each leg, setting the level so that the opposite end of the level is sitting half way between the opposite legs.
Next you will place the mount on to the tripod. Be careful not to bump the tripod so that it is no longer level. The mount will align with the stub on the tripod. There are Azmuth adjustment knobs on each sides of the mount where it fits over the post. You may have to adjust the knobs to open the space between so the mount will fit over the post. Secure the mount to the tripod legs. Lower the counterbalance post at this time and you can attach the counterweights.
The next step is mounting and balancing the lens or telescope and camera on both axis. Make sure when you balance your mount, that all of your equipment is mounted. Align your finderscope and or telrad finder at this point. If it's still daylight use distant trees or structures to sight on. Once it is dark you can begin the polar alignment process. If it is dark when you first begin setting up, you may want to perform the polar alignment step before you put on your counterweights and telescope. Note that your mount will have a clutch knob for the RA axis and a clutch knob for the declination axis. Those knobs lock and unlock the clutch for each axis. You need to unlock the clutch to manually rotate the axis, then lock the clutch when you want the motors on the mount to rotate the axis or if you want the axis held in place during polar alignment or balancing. Make sure you read your manual on your mount to become familiar with these operations.
Polar Alignment:
This is the most critical step for astrophotography! Hopefully your polar finderscope has been collimated properly because now is not the time to be having issues with it! If your polar finderscope has not been collimated or is out of alignment, then you will not be able to get a good polar alignment! The first step of polar alignment is to find polaris in your polar finder scope. In my mount, in order to see through the polar finder scope, the counterweight post must be lowered all the way, and the declination axis must be rotated 90 degrees so the telescope is pointing east and west. Remember to unlock the declination clutch before moving the declination axis. Then lock the clutch after you have rotated the axis. Open your azimuth adjustment screws so your mount will turn left and right (east and west). You may have to slightly loosen the knob that secures the mount to the tripod legs so you can slightly rotate the mount east and west on your tripod. Look for Polaris (The North Star) in your finderscope. Once you have polaris located in your polar finderscope, you are ready for the final position of it in your polar finderscope.
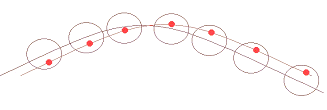
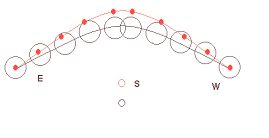
There should be a circle (with about a 40 arcminute radius) in the view of your polar finderscope. The circle represents the orbit of Polars around the celestial north pole. The celestial north pole being the cross hairs at the very center of your polar finderscope. If your mount has an internal illuminated alignment scope, you will want to connect power at this point and turn on the mount to illuminate the polar finderscope. You should also notice a smaller circle located or stamped on the larger orbit circle. That smaller circle will be where you eventually place Polaris. Note that when the counterweight arm is pointing down at the ground, that smaller circle will be at the bottom (6 o'clock position) of the Polaris orbit circle. This is the Home Position of the RA axis on your mount. There are four ways to align using the polar scope.
- Using the constellations - not very accurate
- Using Polar Finder Software
- Setting Circles
- Using Polaris, Kochab, and counterweight post
Polar Alignment using the constellations:
The first and least accurate way is to align using the constellations. Your finderscope will probably have an image of the big dipper and Cassiopeia in the view. If you rotate the RA axis so that the those constellations in the finderscope match where they are currently positioned in the sky, the smaller circle stamped on the Polaris orbit circle will end up where Polaris should be positioned in your finderscope. Note that the constellations in the polar finder are not to scale but only represent their position in relation to the celestial north pole (the center of your polar finderscope). I should also mention that since your polar finderscope is actually a small telescope, your view of Polaris in the scope is upside-down and backwards. The small circle for the placement of Polaris is compensated for this, so by putting Polaris in that small circle, you will be closely polar aligned. Once positioned so that the constellations in your polar finder are matching their positions in the sky, lock the RA clutch so the RA axis does not move. You will position Polaris in the smaller circle by adjusting the azimuth screws (the screws that move the mount east and west) and the ALT screws (the screws that move the mount up and down or north and south). Once Polaris is located in the circle you are roughly polar aligned.
Polar Alignment using PolarisView software:
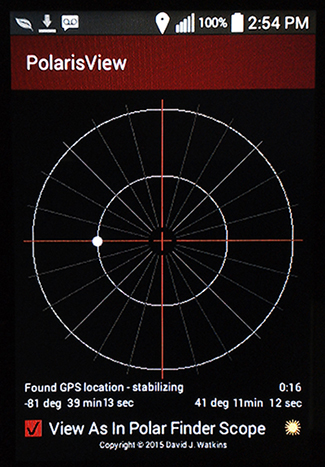
An accurate and probably the easiest way to polar align, is to use an application that I wrote called
PolarisView. I have two versions; one
for Windows® and one for Android™ devices. They are both free for personal use or for non-profit
organizations including astronomy clubs. You can download them on my
Astro Software Page. Or
you can download the Android™ version
at the GooglePlay store,
or at the Amazon Appstore
. The Android™ app will use the GPS sensor or the mobile data to locate your current position. If you use
the Windows®
app, you will have to enter your location and time zone for the program to work. You can save all of your favorite locations
so you only need to choose your current location from a drop down box.
If you use the Windows version, you need to make sure your computer time is set to the current time and in the current time zone
so Polaris will plot correctly. Note that neither app will handle time zones that are off by 30 minute increments.
So if you are using the apps in India, you will have to manually adjust accordingly.
Once you select your location (Windows app) or the GPS sensor finds your location (Android app), the position of Polaris will be
plotted on the grid. You can view the position of Polaris in two ways; the default is to view Polaris as it appears
in your polar finder scope, you can also set the app to view Polaris as it appears in the sky. Both views are relative
to the celestial north pole. So using the default view, as it should appear in your polar finder scope, you adjust your
GEM mount so that polaris appears in the same position in your polar finder scope as it does on the grid of the PolarisView
app. To position Polaris to that spot, you adjust the
azimuth screws and the ALT screws on your mount. Azimuth screws move Polaris east and west, and ALT screws move
polaris north and south.
I have been able to get two minute exposures with the DSLR on my 8 inch Celestron scope, without trailing stars and without autoguiding, just
by using my software for the polar alignment.
Polar Alignment using Setting Circles:
If you have a GOTO mount with a handset display and a dial with markings from 0 to 23 that rotates with your RA axis, then you can use this method for your polar alignment. Typically on your handset, after you enter the location, date, time, etc on your handset, one of the last things displayed will be HA=<some time in hours and minutes> and Clock=<some time in hours and minutes>. The HA time or Hour Angle information can be used with the setting circles. The clock time can be used to position polaris with the position in your polar finderscope view.
HA time (Hour Angle):
Warning you will want to remove your telescope or lens from the mount if the HA is
between 6:00 and 18:00, as your telescope or lens may hit the tripod legs during the alignment!
HA is the hour angle, that is the amount of time in hours and minutes since Polaris last transited the
meridian (highest position) around the celestial north pole. Set your RA axis to it's home position,
that is with the counterweight arm pointed directly at the ground. Use the dial on your RA axis and
line the 0 on the dial with the arrow or indicator mark on your mount. Notice the markings on the dial
indicate hours and usually 10 minute increments. And there is a top row and bottom row of numbers on
the dial. The top row and bottom row each start at zero and one row increments from 0 to 23 rotating
clockwise and the other increments from 0 to 23 rotating counter clockwise.
If the HA time is less than 12:00, you will slowly rotate the RA axis counter clockwise and
watch the row of numbers on the dial that increment from 1 to your HA time. The smaller markings
between the hour markings are typically 10 minute increments so example if your HA time is 5:50 you
will rotate the RA axis 5 hours counter clockwise and then 5 more of the small markings. If your
HA time is something like 5:52 then you should adjust it slightly past the 5th small marking estimating
where two minutes past the 5th small marking would be. After you rotate the RA axis counter clockwise
to your HA time and lock your RA clutch, you can look through your polar finderscope and find the small
circle along the Polaris
orbit. This will be where you want to position Polaris using the azimuth knobs and ALT knobs.
Azimuth screws move Polaris east and west, and ALT screws move polaris north and south. Position
polaris in that small circle and you will be polar aligned.
If the HA time is greater than 12:00, you will slowly rotate the RA axis clockwise and
watch the row of numbers on the dial that decrement from 23 to your HA time. The smaller markings
between the hour markings are typically 10 minute increments so example if your HA time is 21:30 you
will rotate the RA axis clockwise until you see the 21 hour mark, then bring it back (counter clockwise)
to the 3rd small marking. then you will be at 21:30. If your HA time is something like 21:35
then you will position it half way between the 21:30 mark and the 21:40 mark on the dial. After you
rotate the RA axis clockwise to your HA time and lock your RA clutch, you can look through your polar
finderscope and find the
small circle along the Polaris orbit. This will be where you want to position Polaris using the
azimuth knobs and ALT knobs. Azimuth screws move Polaris east and west, and ALT screws move polaris
north and south. Position polaris in that small circle and you will be polar aligned.
Clock time:
Warning you will want to remove your telescope or lens from the mount if the Clock time
is between 0:00 and 3:00 or between 9:00 and 11:59, as your telescope or lens may hit the tripod legs
during the alignment! The Clock value is the actual position of Polaris as it would appear
in the view of your polar finderscope if the Polaris orbit circle were a 12 hour clock
and Polaris was the hour hand on the clock. 0:00 being the top most position on the
Polaris orbit circle. 6:00 being the bottom most position on the Polaris orbit circle.
So you simply rotate the RA axis so the small circle is in position on the larger Polaris Orbit circle
as if it were representing the hour hand on a clock. Lock your RA clutch, then position Polaris in that small circle
using the azimuth screws and the ALT screws on your mount. Azimuth screws move Polaris east and
west, and ALT screws move Polaris north and south. Position Polaris in that small circle and you
will be polar aligned.
Polar Alignment using Kochab, Polaris, and your counterweight Post:
This is probably the most accurate method but is a little more time consuming than the software. I
used to use this method, but since I have the software I use it as it is much quicker, and I don't really notice
that I gain any more time before stars trail with this method. The final adjustment methods below will
get you the rest of the way or autoguiding will correct for any tiny offset that may be present.
Warning you
will want to remove your telescope or lens from the mount if the star Kochab is located above Polaris in the sky,
otherwise your lens or telescope may hit the tripod legs! This method involves visually locating
Polaris and the star Kochab. Kochab is the next brightest star in the little dipper. Polaris
is the brightest star in the little dipper. Kochab is the bottom and outer star of the ladle or cup of
the little dipper. Rotate your RA axis so that the counterweight post is in line with both Polaris and
Kochab. Polaris will be closest to your mount and Kochab will be toward the end of your counterweight
post. If you can eye them up so they both seem to be touching the same side of your counterweight post
lock your RA clutch. Now look through your polar finderscope and use the azimuth screws and ALT screws
to move Polaris into the smaller circle. Azimuth screws move Polaris east and west, and ALT screws
move Polaris north and south. One Polaris is positioned in the smaller circle, you are polar aligned.
Polar Alignment final adjustment:
What, we're not done yet? The four polar alignment methods discussed above will get you close, very close in fact, but not close enough if you are not autoguiding! So how do you get a perfect alignment? You have two choices, software assisted alignment, or the manual drift method. So why did we go through the four methods above if they're not perfect? Because you need to be really close before you can use software or the drift method to finalize your alignment! One thing to note, if you are using a camera lens only as in no telescope, then you may be close enough for up to 3 minute exposures. You will find it very difficult to use the drift method or software assist method with a camera lens only.
Final Polar Alignment - Drift Method:
The Drift method can be a very long process at first until you get the hang of it. It is the most accurate method. The first thing you will need is an illuminated reticle eyepiece. Illuminated reticles typically have a pair of parallel lines running east west and a pair of parallel lines running north south intersecting with a square formed in the middle of the eyepiece. You will want something close to 200x magnification on your telescope.
Check Azimuth (East, West) Alignment.
Point the telescope roughly at the meridian and celestial equator, select a star and center it in the
eyepiece. The star can be 10-20 degrees north of the celestial equator. Alignment is
easier if the star is north of the celestial equator. Next you will want to determine east
west and north south movements as detected in your reticle eyepiece. Rotate the reticle eyepiece
so that when you move the RA axis back and forth with your hand controller (usually left and right
buttons on the hand controller) the star moves back and forth and stays between one of the pairs of
parallel lines. Use the hand controller to move the star back toward the center of the eyepiece
using the RA axis only keeping it between the parallel lines. Then watch for north or south drift
in the eyepiece.
If there is north or south drift, you will need to adjust the azimuth screws on the mount. If the southern end of the mount axis is skewed to the east (north end of the mount skewed to the west), the star will drift north if you have a diagonal in the optics path like on a Schmidt Cassegrain telescope. If there is no diagonal in the optics path like on a reflector telescope, the star will drift south. So you would need to loosen the east azimuth screw and tighten the west azimuth screw. Watch the star until no drift occurs after 5 minutes.

If the southern end of the mount axis is skewed to the west (north end of the mount skewed to the east), the star will drift south if you have a diagonal in the optics path like on a Schmidt Cassegrain telescope. If there is no diagonal in the optics path like on a reflector telescope, the star will drift north. So you would need to loosen the west azimuth screw and tighten the east azimuth screw. Watch the star until no drift occurs after 5 minutes.
Check Alt (North, South) Alignment.
Point the scope to a star roughly 15 to 20 degrees above eastern horizon between the celestial
equator and 20 degrees north of it. Next you will want to determine east west and north
south movements as detected in your reticle eyepiece. Rotate the reticle eyepiece
so that when you move the RA axis back and forth with your hand controller the star moves
back and forth and stays between one of the pairs of parallel lines. Use the hand controller
to move the star back toward the center of the eyepiece using the RA axis only keeping it between
the parallel lines. Then again watch for north or south drift in the eyepiece.
If there is north or south drift, you will need to adjust the ALT screws on the mount. If the star drifts north and you have a diagonal in the optics path the Altitude Axis is too low. If there is no diagonal in the optics path then the Altitude Axis is too high. Likewise if the star drifts south and you have a diagonal in the optics path the Altitude Axis is too high. And if you do not have a diagonal in the optics path the Altitude Axis is too low. Adjust the ALT screws to counter the drift. Watch the star until no drift occurs after 5 minutes.
After you perform the ALT alignment, you should check the Azimuth alignment again. If there is no drift after 5 minutes you are finished. If there is drift then you should perform both Azimuth and ALT alignment again.
Final Polar Alignment - Software assisted:
I use a software package called Allignmaster.
You can download a free 30 day trial and it is only 14 Euro or $19.00 USD to purchase the
software. You should take the time to watch the video presentation on the website.
Note that this software only runs on Windows PC's, XP, Vista, 7, and I am running it on Windows
8.1. The software requires that you first download the
ASCOM drivers (a free open
source set of drivers) for your mount and install them on the PC that you will use to polar align your
mount. The ASCOM drives also require the Windows .NET framework version 3.5.1. You may have to
download the framework from Microsoft, or you may just have to enable it on your PC. When you run
the Alignmaster software for the first time, you will have to setup the ASCOM driver. You will need to
select the mount type. For the Orion Sirius and the Atlas mounts, you would select the NexStar 5 driver.
You will also need to connect via a serial RS232 port from your PC to the hand set controller of your
mount. Most PCs today do not have RS232 ports, so you will need a USB to RS232 converter to make
the connection. Your mount should have been supplied with an RS232 cable to connect to the handset
controller. The handset side is an RJ11 jack and the computer side is a 9 pin D connector.
The handset controller typically has two jacks one to connect to the mount and one for an RS232 port to
connect to a computer.
Just as with the drift alignment, you should use an illuminated reticle eyepiece something
that will give you close to 200x magnification.
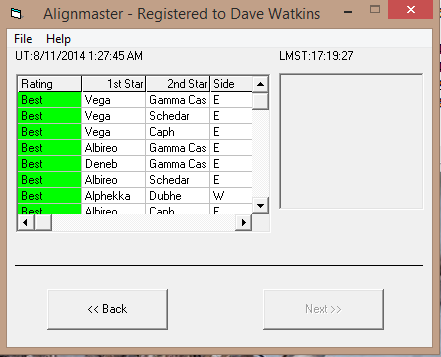
Allignmaster works by controlling your mount and slewing it to a pair of stars that you chose from a list. Make sure your mount is at the Home position in both the RA axis and the declination axis before you start the Alignmaster program. Home position for RA is when the counterweight post is pointed straight down at the ground. Home position for declination is when the dovetail plate on your mount is perpendicular to the RA axis. You will first have to enter your location parameters in the Alignmaster software and offset from GMT. Once you chose a pair of stars, Alignmaster will slew your mount to the first star of the pair, or you can slew it to the star with your hand controller. Alignmaster will prompt you to center the star in your eyepiece, then hit the next button when centered. Next the software will slew your mount to the second star, or you can slew to it with your hand controller. Alignmaster will prompt you to center the second star in the eyepiece, then hit the next button when centered. Alignmaster will calculate how far off polar alignment you are from the centering corrections that you performed on the hand controller. Alignmaster will then move the star off center and prompt you to re-center using the azimuth screws. Once this is done, Alignmaster will move the star off center again and prompt you to re-center using the ALT screws. You have the choice at that point to perform another iteration of the alignment. Three iterations is usually enough to get you very close to perfect.
Final Polar Alignment - More:
There are other software packages to assist with polar alignment, some use your guide camera, others walk you through the drift method. I do not have any experience with anything other than the drift method and Alignmaster so I cannot comment on how well the others work or how easy they are to use. Once you are polar aligned to are ready to image. One more thing... Don't forget to tighten the bolt(s) holding your mount to the tripod, if you loosened them up during the alignment. And don't forget to make sure the Azimuth screws and ALT screws are tight. Do this check during the alignment, because if you do it afterwards you will likely change the alignment! Re-check the position of polaris in your polar finderscope after you tighten any of the screws.
GOTO controller alignment:
A GOTO mount allows you to select an object on your handset and the mount will slew directly to that object. In order for the mount to be able to do that, it has to be aligned or calibrated to the sky. Most mounts will give you the option of performing a 1, 2, or 3 star alignment. The mount attempts to slew to each star, then prompts you to center the star in the eyepiece of the telescope. It will then attempt to map the sky in its internal memory. A three star alignment produces the best results. If you have a GOTO mount, then immediately following the polar alignment, you will want to perform a 2 or 3 star alignment so the GOTO feature of the mount can map the sky in memory for your viewing or imaging session. I always shut the mount power off after the final polar alignment. Next you want to make sure the mount is in it's Home position for both the RA and declination axis. Home position for RA is when the counterweight post is pointed straight down at the ground. Home position for declination is when the dovetail plate on your mount is perpendicular to the RA axis. Then I power the mount back on and yes I have to enter the location, date, time, again. My mount holds the last values entered for location and date. It is the exact time that I have to re-enter. Cycling power on the mount ensures that the mount is in complete control at this point. The GOTO feature is not absolutely necessary unless you are not comfortable finding objects in the sky. It is helpful for me because I am not yet a master of the sky! I find that the 3 star alignment almost always puts the object that I am looking for in a 40mm eyepiece. If the first 3 star alignment does not, then a second iteration almost always will.
Tracking Rate:
If you use the GOTO function then the mount will already be in the correct tracking mode for the object that
you send the mount to. If you do not use the GOTO function and manually slew or manually position the
mount to the object you want to image or view, then you will have to manually set the tracking rate.
Read your manual to determine how to set the tracking rate.
There are typically three tracking rates that can be set.
- Sidereal: Tracking rate for stars, nebula, clusters, galaxies, planets
- Lunar: Tracking rate for the Moon
- Solar: Tracking rate for the Sun