by David J. Watkins
Beginning Astrophotography - The Planets
1) Astrophotography 101 2) Wide Angle 3) The Moon 4) Large Nebula 5) DSO's 6) Planets 7) The Sun
Shooting the Planets:
Most of the planets in our solar system are very bright. The problem with planets is that they are very tiny and must be shot with very high magnification to reveal any surface detail. You can shoot them with fast exposures because they are so bright, but most detailed planet images are shot using video and software is used to stack the sharpest frames from the video. You can use a camera and a supertelephoto lens to shoot Jupiter or Saturn, but the image will be tiny and lack surface detail. You can also shoot them from a tripod, but a tracking mount works best, or else you will be constantly re-centering on a tripod. At high magnification, planets move very quickly, and will move out of the frame in a few seconds. Shooting Mercury, Mars, Uranus, or Neptune, requires a telescope and tracking mount. Through a camera lens, those planets will just look like a star.
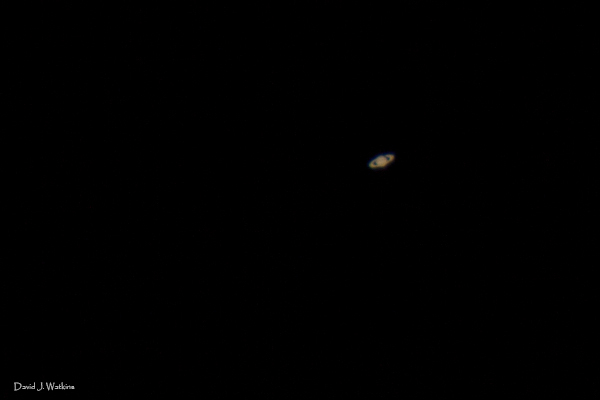
This is what Saturn looks like through a 1680mm camera lens. The image is also cropped 100%. I used a Canon 5DMarkII, a 600mm lens with both a 2X and 1.4X extender attached. Shot at f/8 ISO100 1/6 sec. It's cool to see and while you're shooting it, but it's not a very useful photograph. You can see the ring, but no surface detail. This is about as good as it gets with a lens.
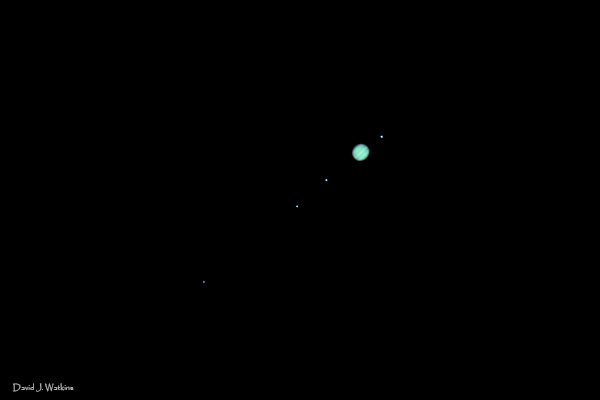
For this shot of Jupiter and its moons, I used the 600mm lens with both the 2x and 1.4x extenders for 1680mm total. This is a 100% crop of the original image. The photo is scaled again to fit on this web page. To get the atmosphere of Jupiter to show, I stacked 29 images of Jupiter shot at 1/60 sec, ISO 100, f/8. I stacked 9 shots for the moons of Jupiter at 1/4 sec each. I used GIMP an open source (free) image manipulation program to manually do the stacking. It's cool to see but is not a very useful photograph.
To give you a sense of scale when shooting planets, you have to understand field of view in your lens or telescope and relative size of the planet as viewed from earth. In astronomy relative size is expressed in degrees, arcminutes or arcseconds. There are 60 arcminues in a degree, and there are 60 arcseconds in 1 arcminute. The diagonal field of view in a Canon EF600 f4L lens is 4 degrees 10 arcminutes. That would be 250 arcminutes or 15000 arcseconds. The scale below shows the comparison of how the listed objects appear in size viewing from the earth. Note that the size will change depending on how far from earth the object is during its rotation around the sun.
| Object | Size |
| Moon | 29 - 34 arcminutes |
| Venus | 9 - 66 arcseconds |
| Jupiter | 30 - 50 arcseconds |
| Mars | 3.5 - 25 arcseconds |
| Saturn | 15 - 20 arcseconds |
| Mercury | 4.5 - 13 arcseconds |
| Uranus | 3 - 4 arcseconds |
| Neptune | 2 arcseconds |
That would mean you could line up 7500 Neptunes diagonally across a 600mm shot! Even at 1200mm that would be 3750 Neptunes or 1875 Uranus'! That is why a telescope is best along with a barlow or Televue Powermate eyepiece.
Since planets require very high magnification, the stability of the atmosphere has a significant affect on how you will be able to image the planets. Under less than perfect "seeing" conditions the planet will appear to move around and not stay in the same place even while tracking perfectly. It may even appear to expand and contract. By shooting video, you are capturing hundreds or even thousands of frames. By capturing hundreds of frames, the chance that you get moments of stability in the atmosphere increases. It is during those moments of stability that the video will produce a sharp frame. You can then use software to search for the sharpest frames within the video then stack those sharp frames for a higer resolution image. In the image below of Saturn, you can see how even a 1.2 megapixel camera can produce a relatively sharp image even in average to poor seeing conditions.

Shot with a Celestron EdgeHD 8 inch Schmidt Cassegrain telescope with a 2.5X Televue Powermate eyepiece (5075mm equivalent focal length) and a QHY5L-II autoguider camera - Grayscale CCD camera in video mode using Fire Capture software. The camera is only a 1.2 megapixel camera. You can clearly see the Cassini Division in the ring. You can also see some banding in the atmosphere.
This is the original video capture used to produce the image above. The large movemens are from when I re-adjusted the mount to center Saturn. I did not polar align the mount before I began imaging so Saturn drifted quickly to the edge of the frame. You can see how unstable the atmosphere was while I shooting the video.
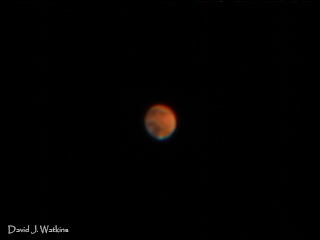
Mars - A telescope and video can begin to reveal surface detail. Here you can see the polar ice cap on Mars along with some of the surface detail. This image was taken on a poor night of atmospheric seeing. Imaged with a Canon 5DMarkII in 1080p video mode at 30 fps and Celestron EdgeHD 8 inch telescope with 2.5X Televue Powermate.
This is the original video capture used to produce the Mars image above. Again you can see how unstable the atmosphere was while I shooting the video.
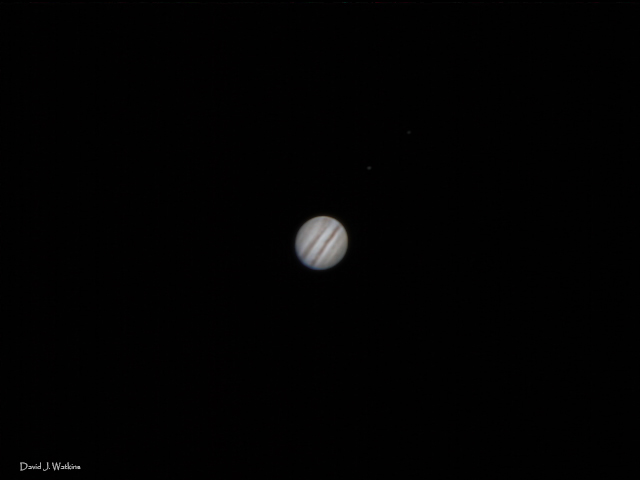
Jupiter - Imaged with a Canon 5DMarkII in 1080p video mode at 30 fps and Celestron
EdgeHD 8 inch telescope with 2.5X Televue Powermate. Two of Jupiters moons
are also visible in this image.
The software used to select the sharp frames and sort them by sharpness
is Planetary
Imaging PreProcessor (PIPP). The software to perform the stacking is
AutoStakkert!

Jupiter - Imaged with the QHY5L-II with LRGB filters for color and Celestron EdgeHD 8 inch telescope with 2.5X Televue Powermate. Four sequences of video were shot to get this image, one with each of the LRGB filters. One issue with imaging Jupiter especially with LRGB filters, is that Jupiter rotates very fast. A Jupiter day is less than 10 hours! This means that atmospheric detail will move in a matter of minutes. There is software that will actually derotate the cloud features so that all of your LRGB images will line up. WinJupos is a software designed to derotate images as well as to plan when the giant red spot will be visible or when the moons will transit.
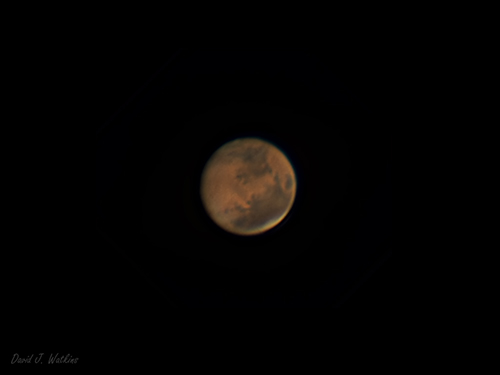
Mars - Imaged with a 6 MP ZWO ASI178MC color CMOS camera on the Celestron
EdgeHD 8 inch telescope with 2.5X Televue Powermate. I used FireCapture software to capture video at
about 80 frames per second for just under 10,000 frames captured. Used AutoStakkert! to sort and stack the
best 30% of the frames. Then used PixInsight for Wavelet sharpening.
As you can see a dedicated high speed video astrophotography camera shines at planetary photography. Another tip espcially for
Mars, is to use an additional Infrared Cut filter. It will reveal a sharper image and cut down on the saturated colors. This image
was taken shortly after opposition (June 8, 2016).
Focus:
Yes, perfect focus is extremely important for capturing surface detail on a planet. Focusing on a planet is an exercise in frustration. It takes a long time to get that perfect focus. Many astrophotographers will use an electronic focuser so that they do not have to touch the telescope. I do not have an electronic focuser, so I have to manually focus. I'm sure an electronic focuser saves a great deal of time over manual focus. But a perfect manual focus can be achieved, it just takes a long time. It is very difficult to focus on something that is moving around so quickly.
Review Of Recommended Equipment:
- Equatorial GEM Tracking Mount
- Medium (1000mm) to Long (2000mm or greater) focal length telescope.
- Barlow Eyepiece or Televue Powermate, with adapter for camera.
- DSLR with video, Grayscale or Color CCD/CMOS with video or inexpensive Webcam
- Software: Planetary Imaging PreProcessor (PIPP), Registax, AutoStakkert - all three are free!
- Electronic focuser for the telescope - though not an absolute necessity.
Equipment you might be able to get away with:
- Tripod for imaging Jupiter or Saturn.
- Super Telephoto Camera Lens with tele-extenders for Jupiter or Saturn
- Shooting still images with DSLR
1) Astrophotography 101 2) Wide Angle 3) The Moon 4) Large Nebula 5) DSO's 6) Planets 7) The Sun