by David J. Watkins
Beginning Astrophotography - The Sun
1) Astrophotography 101 2) Wide Angle 3) The Moon 4) Large Nebula 5) DSO's 6) Planets 7) The Sun
Shooting the Sun:
To photograph the sun, the first thing you will need is one of the types of solar filters. NEVER point your telescope or finderscope toward the sun without a solar filter! There are a few types of solar filters;
- Mylar or Film Filter
- Glass Filter
- Hydrogen Alpha Filter
Mylar or Film Filter:
Type of white-light solar filter. Tends to show the sun with a white or blue cast. Shows sunspot detail on the surface as well as some surface texture.
Glass Filter:
Type of white-light solar filter. Tends to show the sun with a yellow or orange cast. Shows sunspot detail on the surface as well as some surface texture.
Hydrogen Alpha Filter:
Hydrogen Alpha (Ha) filters allow only the red spectrum Hydrogen Alpha light through. The sun will appear as a reddish-orange globe. This filter will reveal solar prominences or flares and surface detail. Ha filters actually consist of two filters, light limiting filter on the objective lens or at the end of the telescope where the light enters, and the Ha filter at the eyepiece end. An Ha filter system is very expensive, especially for wider aperture telescopes. NOTE: This is NOT the same Hydrogen Alpha filter that you use for DSO imaging!
Dedicated Ha Solar Telescope:
There are a few manufacturers of dedicated Ha solar telescopes. Lunt and Coronado (meade) are the two most popular. You can get a budget scope with a 40mm objective lens for under $900 or intermediate 60mm objective lens scope for under $1600 or a 90mm objective lens scope for $5000 or more. There are different filter arrangements for the Coronado scopes. Coronado makes 3 different blocking filters built into the diagonal; BF5, BF10, and BF15. BF5 is best for viewing only, BF10 and BF15 are best for photography or barlows. The filter is further from the camera or eyepiece on the BF10 and BF15 so there is less vignetting. BF15 is the furthest causing the least vignetting. The 40mm and 60mm scopes are typically in the 400mm focal length range. The 90mm scopes are typically in the 800mm focal length. The dedicated scopes in the 60mm and 90mm can be tuned differently to view or image the solar surface or for prominences.
Lens or Telescope:
You can get solar white light filters for just about any camera lens or telescope. To shoot images of the sun and show
surface detail like sunspots, you want at least a telephoto or super-telephoto lens. A telescope in the 400mm focal length range
will put you in a good range for imaging. Though if the pixels on your CCD/CMOS camera are small and you want full disc images of the sun,
you may want to go a little shorter (300mm) on the focal length or try a focal reducer to fit the solar disc on the sensor. Imaging the sun can be
very dangerous if you are not careful! Do NOT try to make your own solar filter! You can damage your scope and camera and worst case you
can damage your retina! Purchased solar filters from a reputable company are safe when used correctly.
Hydrogen Alpha filters consist of a filter system, typically with two components. They are NOT designed for camera lenses, as they
typically put the Ha filter in the eyepiece diagonal. The filter at the objective end of the telescope is typically a light blocking filter.
So a telescope is the only option if you choose to shoot Hydrogen Alpha. The dedicated Ha scopes are a good choice.
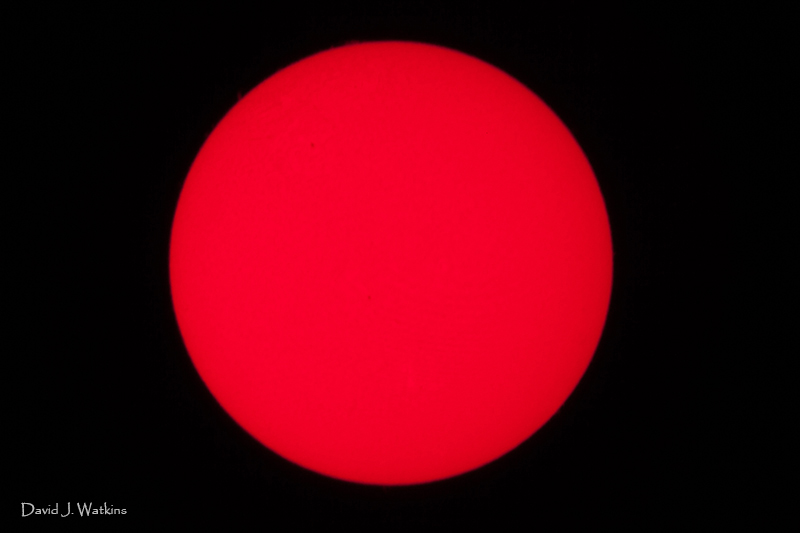
(Image Above:) Canon 5DMarkII (un-modified) ISO400, 1/160 sec, Coronado Solarmax II 60mm (Hydrogen Alpha Scope) with BF15 blocking filter, Televue 5X Powermate and shot from a tripod. This image is unprocessed and was only converted from a RAW to a JPG format. As you can see there is no surface detail visible other than a few sunspots. This was my second attempt at capturing a solar image. The first attempt I tried video and stacking, but did not achieve good focus.
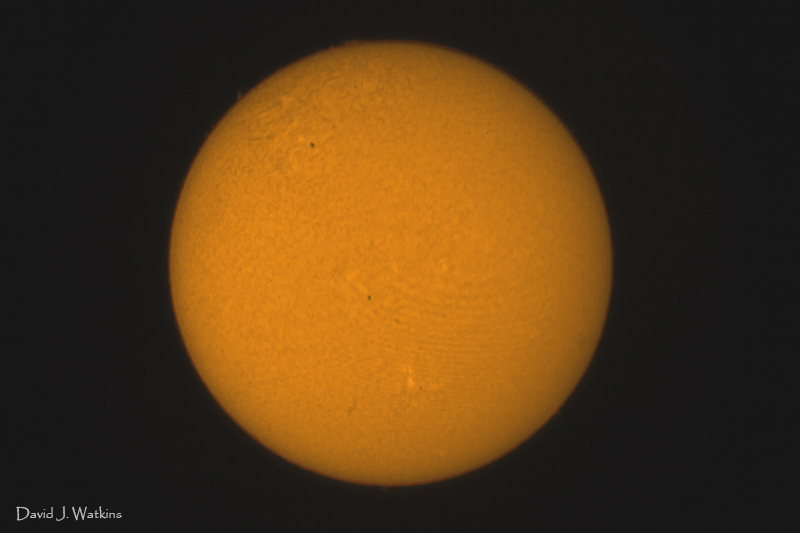
To bring out detail in solar images shot with a DSLR and Hydrogen Alpha Scope, you will have to do a lot of post-processing work.
This is the same image as above, but with some post-processing applied. I made a copy of the original image and
used PixInsight to stretch down the Histogram to bring out surface details. Then used Photoshop
to merge with the original image. The original image was used to preserve the solar prominences.
Once the images were merged, I changed the color hue to more of an orange yellow color. One anomaly that
is likely to present itself in solar images is "Newton's Rings". Those are the strange looking
alternating dark and light curved lines just below the center of the image. It is caused by reflections
between a flat lens and a convex lens. So why does it only show up in solar images? When shooting
in Ha, you are essentially capturing light at a single frequency. In images with wider frequency bands or
more wavelengths of light, the effect gets cancelled out or overpowered by all of the light from all the
different frequencies.
Cameras:
Dedicated Grayscale CCD or CMOS astrophotography cameras are the way to go for solar imaging in Hydrogen Alpha. Color cameras filter out most of the light since it is only in the red spectrum. The Bayer RGGB filter causes the sensor to capture only the red channel and hardly anything in the green or blue channels. The pixels in green and blue channels end up severely underexposed, while the red channel typically gets severely saturated or overexposed. So in the typical DSLR, only one out of four pixels captures any detail, and that detail is extremely overexposed. This is only a problem when shooting through a Hydrogen Alpha solar filter, and is NOT a problem when shooting through a white light solar filter.
Focus:
If you think focusing on a star with a camera attached is very difficult then you are in for a real challenge when you try to focus on the sun with a camera attached! Even though the sun is large, looking through the view finder to focus won't cut it. And if you're used to focusing using live view mode in the camera, try doing that in the bright intense sunlight. Even using a large screen of a tablet PC to focus is a challenge. Some kind of shield or hood is required to block the intense light so you can see the screen to focus. The 3 inch screen on the back of the camera just does not seem to be enough to get good focus. An 8 inch tablet running the Canon EOS utility works much better.
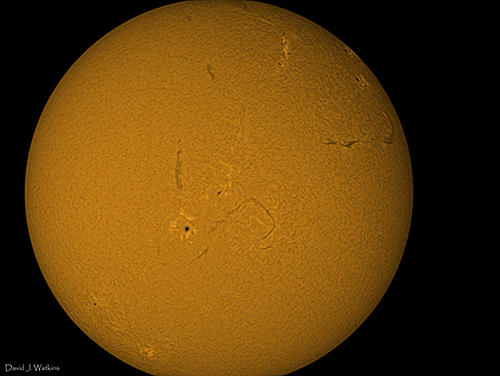
To get surface detail you have to achieve perfect focus. "Close" will not cut it. For this image I shot video with a 1.2 megapixel monochrome camera (QHY5L-II) and used the software FireCapture.
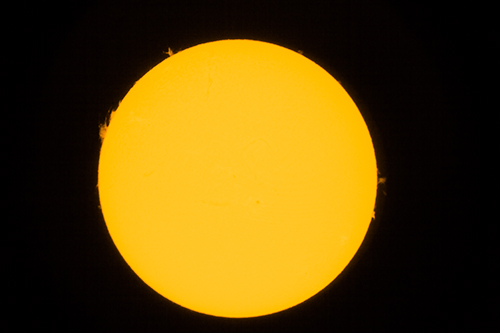
To get prominence detail you have to overexpose the image. This shot happens to be taken as a single shot with my Canon 5DMarkII.
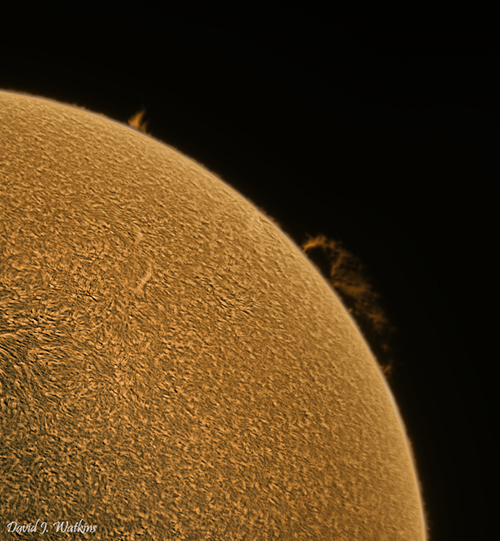
This image was taken with my new ZWO ASI174MM 2.3 megapixel monochrome camera with a 2.5x Telvue Powermate on my Coronado Solarmax II 60mm
solar telescope. The ASI174MM camera was designed specifically for solar and lunar imaging. The 5.4 micron
pixel size works out perfectly for the entire solar disc to fit within the frame of my 60mm scope. With the 3.75 micron pixels
on the QHY5L-II, I had to use a 0.5 focal reducer and a lot of adjusting to get the solar disc to just barely fit within the
frame of the scope. The ASI174MM also captures video at 128 frames per second vs 15fps on the QHY5L-II. The ASI can be
set for even higher frame rates at a smaller region of interest. The higher frame rate greatly increases my chance for capturing those
moments when the atmosphere is stable.
The ASI camera seems to capture more of the prominences even at the faster exposure for the surface detail. I can then
copy the image and stretch the copy to bring out the prominences for the final composite image. With the QHY,
I had to take 2 separate video sequences one for surface detail and one over exposed for the proms.
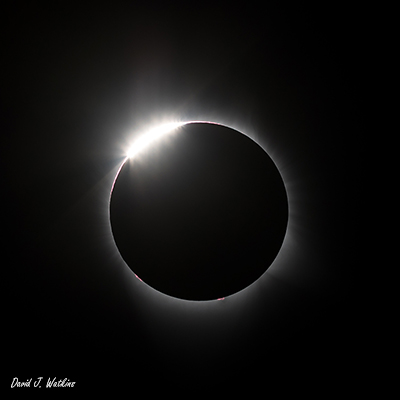
There is one condition where you can take an image of the sun without a filter. That would be in the few seconds before a total eclipse (the diamond ring phase), during totality, and the few seconds after totality. At any other time the sun would damage your lens, camera, and your eyes if you were looking through the lens or at the sun! This image was taken during the diamond ring phase of the August 21, 2017 total eclipse with my 5DMarkIV and 600mm lens. The image is slightly cropped.
Review Of Recommended Equipment:
- Equatorial GEM Tracking Mount
- A white-light filter or Hydrogen Alpha "Solar" filter set.
- Dedicated Ha solar telescope or Ha filter system.
- Barlow Eyepiece or Televue Powermate, with adapter for camera.
- DSLR for white light filters.
- Grayscale CCD camera with video for Ha filters.
- Telescope or camera lens with a focal length between 400mm and 800mm
- Note that a Hydrogen Alpha filter set is not usually adaptable to a camera lens and should not be attempted!
Equipment you might be able to get away with:
- Tripod but will have to constantly re-center the sun in the frame
- DSLR on Ha Filter - but will have a lot of post processing work.
1) Astrophotography 101 2) Wide Angle 3) The Moon 4) Large Nebula 5) DSO's 6) Planets 7) The Sun